Learn. Choose. Change.

I pledge to learn the true cost, to people and the planet, of what I eat, wear, drive, use and do every day. I choose to consume justly and to increasingly change my habits.

Friday, November 1, 2013

Just Make: Homemade Halloween


In order to compensate for the challenges of trick-or-treating in a rural community, our merchants shut down the roads in town to allow walking traffic only and pass out candy.  We had an unusually moderate night temperature-wise last night, which allowed for lots of chatting and admiring costumes.  And although the whole event is a mixed bag for me (I can get pretty worked up about fair trade chocolate and high fructose corn syrup), I do love to see the inventiveness that shines through in people's costumes.  Homemade costumes are definitely the norm around here, ranging from simple (cardboard box Legos, Minecraft, etc.) to elaborate (an oyster shell where her head sticking out was the pearl).

My youngest settled on being a Hedgehog pretty early on.  I was able to keep an eye out for brown clothing at our local thrift store.  The one elusive item was the shaggy fabric for her "spikes".  Last weekend I picked up a white bathmat just in case our trip to the city didn't pay off either.  Surprisingly, we struck out at a huge fabric store, too.  I ended up dyeing the mat brown and sewing it to a resized men's sweatshirt.  We scored an off-white velvet top for her belly and paws and finished off the look with some women's leggings that I also resized.  She was very happy with the whole thing and said it looked just like she pictured.

Considering CNN reported that Americans throw away 40 million pounds in Halloween garbage each year, and that much of that is plastic costumes, making your own out of repurposed clothing is a good way to put a dent in those numbers.  A lot of people also first experiment with sewing and upcycling making costumes.  Hopefully, they'll gain confidence and realize the same techniques work with everyday clothes, too!

Saturday, September 21, 2013

Just Make: Melissa & Doug Shadow Box

Sometimes it is hard for me to believe certain toys in our house are over ten years old.  Part of that is due to how unbelievably quickly the time has flown since we had kids, but I am also amazed at the longevity some of these toys have had in our lives.  The toy kitchen (affectionately known as Tiny Kitchen) along with our wooden play food sets are among our oldest items that still get used regularly.  My youngest still has the Tiny Kitchen tucked away in the corner of her very tiny room and loves to play restaurant with her friends.  However, long gone are the days when we carefully put each set away in its appropriate tray.  As we were streamlining our toy collections this summer, I set these Melissa and Doug trays aside, sure I could use them in some way.
Sitting empty, they reminded me of the old printer's trays people often repurpose as shadow box displays.  I simply wiped them down, sanded any chips in the wood, and then painted them.  We already had black all-purpose spray paint on hand, so I used that.  Obviously, your options are endless when it comes to painting.  I also lined some of the sections with dictionary pages and wrapping paper.  By just using double stick tape, I figure I can change it out if I want.
This was such an easy project that has a lot of versatility.  I'm still deciding if I want to mount them on the wall or leave them lying flat to corral our more varied collections, like my youngest's French collection above, or some of our more special ornaments over the holidays.  Either way, I'm happy to keep these in our lives just a little longer.


Thursday, September 19, 2013

Just Sew: Congo Confection

When it comes to candy, chocolate is the only choice for me.  Even when I was a kid I would pass on all those sickly sweet fake fruit flavored candies.  At our house we have committed to eating only fair trade chocolate for the past few years.  Of all the industries out there exploiting children and imposing forced labor on adults, cocoa is one of the worst offenders.  The majority of the world's chocolate is grown in the Ivory Coast and Ghana.  Most of the workers are "recruited" (often kidnapped or lured under false pretenses) from the surrounding poorer countries.  Once they arrive on the cocoa plantation, many are devastated by the long fourteen hour work days, the poor to non-existent living conditions, and the harsh treatment they receive if they do not meet their quota, not to mention sustaining injuries from their machetes.  Theo Chocolate is a fair trade company based right here in Seattle.  They do lots of cool projects, and we are always happy to support them.  When Project Run and Play announced a candy inspired theme for the second week of this season, I knew right away what to choose.  Theo is sponsoring cocoa farms in the Congo to stimulate the economy and raise awareness, both about fair trade and the current conflict in that country.  As I mentioned last week, I am sewing this whole season for my new niece, who is waiting in the Congo to come home to my little sister.
I began with some thrifted clothes.  The (very wrinkly) pants are a size 5T in a nice, lightweight brown corduroy.  I knew I wanted some brown to represent the chocolate.  The top is a 2T long-sleeved onesie, with My First Birthday (oddly enough) embroidered on it.  Other than being the right shade of pink, this isn't exactly what I wanted to start with for the top, but I just couldn't find anything in my stash or at the local thrift stores to match my vision.
As you can see I resized the pants down to 2T, even managing to save a cute ruffle and bow detail at the hem.  I also ended up cutting out the embroidery (after trying to pick it for about an hour) and doing a reverse applique of the sun and triangles from the wrapper.  The bottom of the onesie was chopped off and finished with a rolled lettuce edge hem to make a big girl shirt.  
 
I have to admit I do not love the results this week.  I really struggled with how to best interpret the printed design with fabric.  Anything I tried with the sun's eyes and nose, which look so African, came out kind of creepy looking in my version.  And, to add insult to injury, the applique is slightly off center.  It's kind of driving me crazy.  I will most likely cut it out and try again, but definitely not in the thirty minutes before the linky party closes!

Saturday, September 14, 2013

Just "Choose": Bikes, Hikes, and Public Transit

A few years ago we bought an old Mercedes wagon and committed to using biodiesel.  Not long after, we bought our house located right "in town" (think 1950s era main street - grocery store, bank, movie theater, etc.) with the intention of walking instead of driving when it came to running most of our errands.  Not surprisingly, we started off great, savoring our walks in the lovely Pacific Northwest summer, happy to not have to find a parking space amongst all the tourists.  But, it didn't take long after the rains started for us to just grab the car to make a "quick run" to the store, bank, etc. justifying that it was such a short distance, and we were using biodiesel, after all...

Fast forward to this past summer when our trusty car started acting weird, dropping into a low gear for no reason or never getting out of first when we started it.  Luckily, my husband is super handy, and he and his friend took a look at it. Unluckily, it was the worst case scenario, and it looked like we would need a whole new transmission.  We were in the unfortunate spot of probably investing more into the car than what it was actually worth.  So, instead of just rushing to fix it, we thought about it.  Because it was summer time, the kids and I were off school/work and could somewhat manage without a car, mostly walking or using the bus.  My husband often rides his bike to work anyway.  Friends that were on vacations offered the use of their cars while they were gone, so we were able to borrow one pretty easily if we needed to.

Then, school started.  We still hadn't come to a decision about fixing the car, and were even discussing biting the bullet and buying electric.  However, we haven't had a car payment in about ten years and are not super excited to take one on again (debt feels icky to us).  My husband was pretty sure we could actually manage without a car for a little while longer to give us more time to make a decision.  I wasn't so sure, because this meant I would probably have to ride a bike.  Like, every day.

We just wrapped up our second week of school, and I have to say, it's not as bad as I thought it would be.  Granted, I thought it would be horrible, but it's really not.  My oldest two ride the school bus to and from the middle school and can walk or get a ride to extra-curricular activities.  My youngest usually rides the school bus, too.  This week she joined me one day on the Metro bus one day (it was going to be 90 degrees and I didn't think I could hack that!), and actually biked with me on another (I work at her school).  And, I will admit, biking together was kinda sort of fun.

I'm sure we will get another car soon, but I can say these two weeks have changed me.  Riding a bike somewhere, especially to work, has become my default.  I sincerely feel I will only resort to using a car as a last resort, and even hope to one day live without one again.

Friday, September 13, 2013

Just Sew: Operation Project $0

About a year ago I started actively participating in the sewing blog world (after stalking/creeping for a year before that).  One of the first blogs I chose to follow was Suzanne's Winter Wonderings Wanderings & Whatnot.  She was challenging herself to create a fall wardrobe for her twin sons without spending any money by using up fabric in her stash and upcycling other cast off clothing.  At the time, I hadn't run across any other blogs with that kind of focus and was excited to find a kindred spirit.

What began as a personal challenge for Suzanne a year ago, has blossomed into a full blown blogging series featuring some heavy hitters in the sewing blog world, that she is calling Operation: Project $0.  While none of my kids were in dire need for an entire fall wardrobe, we did fill in some gaps at the thrift stores before school started.  As we were shopping, it became evident that my youngest has really developed an eye for the potential in clothing.  She knew just what she wanted to (re)create for her first day of school outfit.

Each of the pandas on the shirt above were cut out and reapplied to a thrifted t-shirt (half off at $1.50).  The pandas came from a hand me down shirt that has been in the pajama drawer due to its overall "rattiness".  
The jeans were also a hand me down from big brother, that were, of course, blown out at the knees.  We talked about different ideas for patches, and finally settled on embroidering one of her favorite phrases, "Art Rocks" (this is not the first time I have embroidered this phrase).  We wrote it out in many styles and decided to go with a Rock and Roll kind of font.

She was so proud of her customized look and could not wait to wear it on the first day of school.  I am so grateful for her creative spirit and look forward to collaborating with her more throughout the year.

Thursday, September 12, 2013

Just Sew: Japanese? Remix

Well, nothing like another season of Project Run and Play to kick me back into blogging gear.  This summer, my girls and I got to visit an exhibit at the Seattle Art Museum entitled Future Beauty:  30 Years of Japanese Fashion.  And while there was lots of amazing sewing and mind-boggling techniques, one of my favorite moments was a collection of three sweet dresses on the wall that actually looked like something I would wear.  The silhouettes were similar to the popover dress, only with cap sleeves.  I wanted to recreate the proportions, the use of patterns, and a graphic element like I saw on one of those dresses.

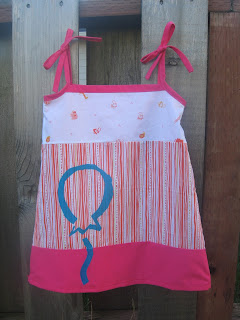
So, obviously for the remix, I pieced together three pieces of fabric.  The solid pink is from a thrift store sheet.  The stripes and the cutie animal print are from some old Birch organic fat quarters.  I also took  advantage of the bias tape in the design and lined the dress with the pink sheet and then hemmed the dress with bias tape as well.  And let me tell you, I sewed this thing so carefully that it became a reversible dress!  On accident!  I am so proud and cannot wait to show it to my husband's grandmother.  When she turns it inside out (because she always does) I won't even flinch.
The only thing left to mention is the lack of a model for this dress.  I am sewing all of this season's themes for my new niece, who is waiting in the Congo to come home to my little sister.  Like all adoption stories this one has been long, and also particularly heartbreaking, but we eagerly expect little Noel by the end of this year.

Sunday, April 28, 2013

Just Learn: Dhaka Factory Collapse

Last week a building that housed a garment factory, among other businesses, collapsed in Bangladesh.  The number of confirmed dead was 359, as of this morning, and though they are still pulling out workers that survived the collapse, rescue efforts are nearing an end as the building is becoming even more dangerous for rescue teams.  There are still hundreds of unaccounted for victims, trapped or dead inside.  The actual death toll may be close to 1,000 workers.

Reports have surfaced that business owners from the building were warned to keep their workers at home after cracks appeared.  Several of these owners have been arrested now for negligence, because they ignored these warnings and forced their employees  to come work in the garment factory.  What has not been as widely reported, is that employees from other businesses (banking and insurance) in the building were not forced to report to work that day.  This is very telling evidence about the type of worker that is exploited in the garment industry and the very little value that is placed on their lives.

While protests erupt in Bangladesh and in the U.S. demanding safer working conditions in the garment industry, it is doubtful any significant changes will be handed down from the government or the industry itself. Garments account for 80% of exports from Bangladesh.  Many executives overseeing this 20 billion dollar business are also involved in local politics. In short, the garment industry is "Big Oil" in this region.

The BBC posted an article online asking, "Can Clothes Industry Change?" The answer is, of course it can, by why would it?  As long as consumers turn a blind eye to the exploitation of the earth's resources and people groups, why would business executives sacrifice their bottom line?  And while Americans are quick to point the finger at obvious targets selling cheap clothes like Walmart or Forever 21, high end labels are actually just as guilty.  Their prices may reflect some higher quality fabrics, embellishments and finishing techniques, but they are typically not paying their workers any higher wages than the ones sewing for Walmart.

This is where the post gets preachy, and most people already know what the solution is:  
1)  Buy less clothing (and fabric!!)  
2)  When you do buy something, looked for it secondhand or as a remnant first 
3)  If you have to buy new, support a company that is verifiably doing things right
4)  Invest in quality pieces of clotihng
5)  Repair/reuse/upcycle what you have
6)  Let companies know you expect change and that they have lost you as a customer

Changing an entire industry often feels like a monumental task, but it truly starts with individuals.  If there can be any good that comes from this tragedy, I hope it is that more people will consider the ramifications of their purchases, and will change their buying habits.


Sunday, April 21, 2013

Just Make: Papercut Window Art

I have long admired papercut art, from the big names like Nikki McClure and Rob Ryan, to the hobbyists selling their work on Etsy.  One of my biggest celebrity thrills was talking to Nikki McClure when she called our little bookstore, concerned we hadn't place our annual calendar order.  (Her concern was warranted because we were, indeed, going out of business).  She was just as gentle and sincere as you would guess she would be from her artwork.  

The appeal of papercutting, I think, is that it is very basic, like drawing.  If you have a piece of paper and an X-acto knife, you can cut.  Just like if you have a piece of paper and a pencil, you can draw.  Similar to drawing, I am sure you can invest in various cutting tools and upgrade, but you really don't have to.  And, the last thing I need to take on is another crafty hobby that requires a lot of tools and supplies!

Our family has a sweet tradition of making paper snowflakes during the holiday season.  The snowflakes are then on display all winter taped to a window.  This year we put them in the window of our front door, and were pretty reluctant to take them down.  (Also, March 21st often still feels like winter in the Pacific Northwest).  But by the beginning of April, the weather took a turn and I felt snowflakes were no longer appropriate.  As a compromise, I said we could put something new and spring-y in the window.  

Over the last year I have done a few small papercut projects, incorporating quotes and lyrics with basic shapes.  I knew we needed to stick to that format for time's sake and to feel successful.  I could not find our large roll of butcher paper anywhere and decided to use newspaper instead.  I may never papercut with anything else!  It is thin enough that it does not take much pressure to cut, but durable enough that it doesn't tear easily (like tissue paper).  It was really a dream to work with and I like what the text and advertisements add to the shapes.  My youngest and I worked together off and on for one morning.  She had fun adding the little animals, while I cut out the quote.  Plus, since the investment of time and materials was so inconsequential, I will have no qualms putting it in recycling when we are ready for a change.

Right now, it still makes me smile every time I look at it, but I am already on the hunt for a good quote for summer and have a hard time imagining our door will ever be blank again!

Thursday, March 28, 2013

Just Use: Certified Pre Owned Cell Phones

I have a confession to make.  I jumped on the cell phone band wagon pretty early in the game.  In 1999, we had just begun our little family and were living in Estes Park, Colorado.  Trips down the canyon to Fort Collins for "supplies" were fairly common, and it put everyone more at ease for the new mother/lone driver to have a cell phone in the car.  Then, once we did the math, we realized we could cancel our long distance plan and just use the cell phone to call far away friends and loved ones instead.

However, because I seem to be genetically programmed to not like shopping and not be tempted by new technology and gadgets, I have only owned three phones since then.  Up until last fall, I was still happily using my old flip phone, not as a camera or a mini computer, but as just a phone.  And then I washed it.  In the washing machine.  This particular phone had already survived being dunked in a glass of water repeatedly by a toddler (someone else's) and falling in the toilet (freshly cleaned, thankfully), so I somewhat confidently took it apart and set it in rice, expecting it to dry out and come back to life.  No luck.

As I browsed Verizon's website for my new phone, I just felt sick to my stomach and could not commit to a purchase.  I knew from start to finish the damage a cell phone causes to the environment.  The components of a cell phone read like a Top Ten list of major pollutants:  lead, nickel, beryllium, mercury, cadmium, and plastic treated with brominated flame retardants.  From mining to manufacturing to usage to disposal these devices poison people and places at every stage.  The numbers are staggering.  There are 3.5 billion phones in use world wide.  The average user upgrades every 18 months (U.S. users are closing in on once a year). Only 20% of users get a new phone because their old one isn't working. Tossed cell phones account for 65,000 tons of electronic waste annually.  And yet, my life right now is structured in a way that it would be difficult to go completely without one.

Frustrated, I finally called Verizon to talk to a sales representative about my dilemma.  It turns out they, and all other major carriers, offer Certified Pre-Owned phones.  It takes a little digging to find them on their websites.  Verizon's is listed under "Deals", assuming your motivation is to just save money.  And although I'd love to get to a point where a cell phone is not a necessity in my life, buying a used phone, with the same kind of warranty granted a new one felt like a workable solution for now.

Other solutions to deal with the cell phone crisis:
-treat your phone carefully so it will last, keeping it in a case and not using it precariously where it might fall (no more talking to my sister and cleaning the toilet simultaneously for me!)
-only upgrade because your phone stopped working, not just to get the newest feature or cool kid toy
-recycle your old phone, but be careful it isn't just getting shipped to a third world country, look for a non-profit organization that actually uses them 


Sunday, March 24, 2013

Just Make: DIY.org


Source: diy.org via Dave Jenni on Pinterest


Our former neighbor recently filmed some promotional videos for DIY.org.  We have been describing this website as a modern day Boy/Girl Scouts, except your troop is all online.  There are badges to be earned for all kinds of skills ranging from the traditional ones like Camper and Medic, to craftier skills like Stitcher and Potter, and even very 21st Century skills like Web Designer and Front End Developer.  Needless to say, it's become a bit of an obsession around our house.

The whole website is designed for kids and is very safe and user friendly.  Kids choose an animal face avatar and are either assigned or create a Nickname.  As you complete your projects to earn badges, you post a picture or a video documenting it to your profile.  Once it is approved (usually within 24 hours) your profile acts like a mini blog that people can follow, favorite, or comment on.

Yesterday, my youngest spent all day building a cardboard house to earn a Fort Builder badge.  At the end of the day she reflected how this could've been a long, boring Saturday.  Both siblings were gone all day (dance rehearsal/BMX riding), the neighbor buddy was off-island running errands, and attempts to schedule last minute playdates were thwarted by being too last minute.  Instead though, she had completed a project from start to finish and was very proud of the result.

I cannot gush enough about this website.  Every adult I've referred to it wants to join, too!  The community it has created online is so sweet and amazing.  It's very inspiring to see what kids are making and the acknowledgement they receive by posting it to their profile.  Best of all, the whole thing is currently free and isn't plastered with ads.  I'm not sure how they manage that or how long that will last, but it certainly makes me love it even more.

(Sorry for the round-a-bout link to her cute little tutorial video above.  I couldn't figure out how to embed it directly from the site.)

Tuesday, February 19, 2013

Just Watch: UAL Green Week Film


Our local school district has been gathering students, parents, teachers, administrators, and other members of the community to talk about what skills our students will need in the future.  The lists we have developed are varied, ranging from tech-savvy to satisfaction with what you have.  The discussions are lively and meaningful and reassuring.  I always leave the meetings energized and full of ideas.

This video, which popped up on UAL's Centre for Sustainable Fashion's blog last week, reminds me of these meetings.  It is very heartening to know that educators at this level are also working towards the same goals as they shape students' attitudes towards design and consumption.  I particularly love the Head, Hands, Heart principle and feel it verbalizes what I do and why I do it that way when I make anything.

Thursday, February 14, 2013

Just Sew: Signature Look

Well, it is the last week of Project Run and Play and I successfully completed all of the challenges.  Kind of.  The final challenge is always to complete a signature look.  Many of the people sewing along really look forward to this week, but I always find it pretty intimidating.  I feel like I have a long life of sewing ahead of me, and have just barely begun the journey - most likely, I am in the getting a full tank of gas before you really hit the road stage.  I am nowhere near nailing down a "signature" look.

Instead I looked at the elements that characterized this season of Project Run and Play for me.  First and foremost this time, everything  I sewed was in response to requests from my kids.  Previously, I have made whatever I wanted and then just sold the items my kids didn't claim for themselves.  Secondly, I worked with a variety of materials beyond old t-shirts and jersey knits.  Lastly, I have really been into the color grey, and I think at least a little bit showed up in every challenge.

I hadn't made anything for my oldest this season and asked her to pick out a dress she liked so I could try and make it.  She gave me several choices, and after looking at the construction and for tutorials online, we settled on this one from Modcloth.

It is a nice, light grey with a paisley pattern worked into it.  We actually had a white sheet with a similar pattern woven into it that we just didn't use any more (downsized mattresses) that I dyed grey.  As you can see, our grey came out much darker, which was disappointing.  I actually only pinned the crocheted lace to our dress because I want to try bleaching/removing some of the color.  Hence, the "kind of" statement in the first paragraph.  


Other than the color I am mostly satisfied with the dress.  The entire bodice is lined and I made an effort to finish it nicely on the inside.  I also successfully dyed the lace with tea to make it closer to ivory, which is what my daughter wanted (although she is wavering on the lace and might want it plain after all - good thing it's just pinned!).  In the end, we decided to forego the buttons, too.

I did not even attempt to make some sort of tutorial for this, as I was really just making it up as I went along.  Everything was self-drafted, trial and error, with A LOT of fittings.  This really pushed my skills and there were probably just as many mistakes as successes.  Once again, I am glad I gave this season of Project Run and Play a try and have definitely seen my skills improve in a very short time.

Thursday, February 7, 2013

Just Wear: Decent Exposures

If you have made some sort of commitment to buying all of your clothing secondhand, you know underwear can be tricky.  Even I get a little squeamish thinking about wearing someone else's underwear.  One solution is to sew underwear (usually out of old t-shirts), but my kids complained they weren't as comfy as storebought, and in the end, they just couldn't hold up to the wash and wear regimen required for them.  When you start hunting for sustainably made underwear, it can get tricky, too.  Although some of the larger companies produce organic cotton underwear, I would still question their labor practices around growing and harvesting the cotton and manufacturing the product.

This is where Decent Exposures, based in Seattle, saves the day.  First of all, it is a one-stop underwear shop, with options for the whole family.  They began in 1986 and have remained committed to the quality of their materials and their manufacturing process.  All of their pieces are made here in Seattle by people receiving decent pay and benefits and flexible schedules.  A friend of mine actually did her internship there and confirmed it is a great environment for a working woman.

They keep a lot of stock on hand, but also do custom orders.  At one point, you could even send them your old t-shirts and they would make them into underwear for you.  Yes, the price for one pair is the same price you might pay for a 3-pack at Target, but the product is of much high quality and will last longer.  Also, I guarantee the people involved in making the 3-pack did not receive a livable wage and benefits.
  
If it is an area of your life that you have considered making a change in, they are definitely worth checking out.  I know I found them because they are local, but I haven't really come across another company like them.  I'd love to hear any other recommendations or suggestions on this topic!


Sunday, February 3, 2013

Just Sew: Men's Shirt Re-fashion

Anyone who has been shopping at a thrift store knows there are always A LOT of men's dress shirts on the racks.  And for every shirt there seems to be a tutorial on how to re-fashion it.  The challenge for this week at Project Run and Play is to create a look using a men's shirt.  My goal this week was to make something I hadn't seen before.  I actually began playing around with this design a few weekends ago because I didn't have a clear idea for this look.  The inspiration came from two designers on last season's Project Runway, Dmitry and Melissa.  Keeping in mind Melissa's cool collars and Dmitry's clean lines and tailored tucks, I tried to incorporate those elements while cutting and pinning this shirt.
 

One of my favorite details is that I swapped out the buttons for these vintage Czech glass buttons with little cats on them.  I picked up the idea of blue and cats again in an embroidered detail on the tailored shorts I made to compliment the shirt.  Two summers ago I scored several bundles of vintage suiting material at a yard sale. 
 
This grey is a nice lightweight wool, and when lined, works well for pants or shorts. Besides the cat, I also added some piping detail on the front, from leftover shirt fabric.  Also, this was my first time creating an adjustable elastic band on the inside of the shorts.

I think because I started this so early I felt like I had a lot of freedom to take risks that I might not have if there was a crunch for time.  Originally the front was just one piece, but then I thought it would be fun to play with the stripes and add some tucks.  I also tried three different styles of sleeves before I gave in to a sleeveless look.  When designers on Project Runway opt for sleeveless, I often think it is a cop-out, and I didn't want to do the same thing.  I did forgo an exposed zipper, and put in a nice side zip instead, though. 
In the end, I am really glad I had so much time and am really pleased with this look.  My youngest likes it, too, and wanted me to try some outlandish "runway" hairstyles and poses when I took the pictures.

Re-fashioning the shirt was actually pretty simple.  First I deconstructed the shirt by cutting off the sleeves and cutting the shirt up both of the seams.  Then I turned the shirt sideways so the front button placket was over the left shoulder.  Next I used a narrow t-shirt as a pattern for the bodice.


Using the existing hemline I drafted the bottom of the shirt.  Originally, I thought about having a more flared out style, but after trying it on my daughter, I decided to keep it more tailored.  After pinning and sewing those pieces together, I realized a side zip would be necessary.  Although functional with a standard zipper (that's all I had on hand), a separating zipper makes the shirt a lot easier when dressing.  The last step is creating half inch bias tape to finish the edges around the armholes.  I used some fabric from the shirt, but you could use a contrasting fabric, too.  I really like how unique this design is, and can't wait to make a summery white one for myself.

This piece was featured by Pam over at Threading My Way.  She has created an amazing resource of tutorials through ongoing linky parties.

Sunday, January 27, 2013

Just Sew: Hooded Scarf

The theme for this week's challenge at Project Run and Play is Valentine's Day.  It is not a day I usually put a lot of effort into, except to help our kids make cards for their classmates each year.  At first I was worried I would only be able to come up with cutesy ideas for my look, and while the above picture is certainly cute, the humor helps it veer away from cutesy.
The hooded scarf is actually a great project for a beginning sewer.  I have taught sewing classes for kids, and this is always a successful activity.  These scarves both began as long sleeved shirts.  I was able to use some shiny scrap fabric and foam to make the horn and antennae.
Cut straight across the shirt at the armpits.  The lower portion will become the hood, and the neck and sleeves will function as the scarf.
Fold the lower portion of the shirt in half, taking care to line up the bottom hem and smoothing out wrinkles.  A lot of mass produced shirts are put together a little wonky, so this takes special attention sometimes.  This gives the hood a double thickness, which makes it lay nicely on your head, and is really cozy.  The bottom hem will be the edge of the hood, framing your face.  (If you make this with kids, you could always cut the shirt at the side seams and forego the two ply version so it is easier to sew through).

After you pin and sew your hood (right sides together) and then flip it right side out,  pin the hood to the inside of the neckline of the shirt.  I like to center it above the label first and work my way out to the edges.  The bottom edge of the top portion can be flipped inside out and pinned right sides together and sewn at this point, too.  Now attach the hood to the neck, and you are done!  This is an extremely versatile pattern that can be customized into just about anything.  I also added a bias trim made from other t-shirts to make these a little more special.
I am just so happy with how these turned out.  The little boy in the picture with my daughter is a close family friend and I have been wanting to sew something for both of them for a while.  I had actually planned on a Tweedle Dee and Tweedle Dum look for my Alice collection last fall (it was going to be my PR&P Boy's Week last season, too), but was too overwhelmed with my new job to get it done.  They are the same age and often get asked if they are twins.  They even both got glasses in first grade.  Despite a makeshift shoot in the garage (raining in the Pacific Northwest again, go figure), dead camera batteries, and switching to an iPhone midway, they were pretty cooperative...until I asked them to hold hands.  I am not ashamed to admit I stooped to bribing, and will be taking them out for ice cream after school this week.


Saturday, January 26, 2013

Just Dance: One Billion Rising

Living in America it is very easy to take for granted the opportunities available to me and my daughters.  Because we have access to education and fair wages, we forget that even in the 21st century, this is still not the case for many women and girls across the globe.  One Billion Rising is a movement to raise awareness around women's issues.  One trendy strategy they are using is worldwide flash mob demonstrations scheduled to take place on Valentine's Day.  Each location will take footage and it will be edited together into, what I am sure will be, a very moving video of women from just about every culture standing up for each other.

Now, even though both of my daughters have been dancing for several years, I am not a dancer.  And the type of dancing required for the flash mob is probably my least favorite style of dancing (it has a world funk/zumba feel to it).  HOWEVER, I felt like this was a great opportunity to talk to my daughters more about struggles girls their age face in other countries and to show them how they can use dance to make a statement.

We attended our first rehearsal this afternoon and there were 40 to 50 of us aged 8 to 68.  Yes, I was totally outside of my comfort zone as I tried to follow the steps, but as the song built to the end and culminated with everyone pointing to the sky, I have to admit, I got a little choked up.  Many ages and backgrounds were represented in just our small room, and I imagined the actual event uniting us all across so many different boundaries.

Our community is staging our flash mob mid-afternoon on Valentine's Day.  Many are planning on joining a bigger mob in Seattle that evening, which is expected to draw thousands of participants.  And though some might ask what a flash mob accomplishes, I can say it has already been effective in our household, establishing connections, sparking conversations and exploring actions we can take to make a difference. 

Tuesday, January 22, 2013

Just Make: Mini Memory Cards

Over the holidays we had an impromptu dinner with our neighbors and my youngest worked all afternoon on a felt snake toy for their daughter (complete with handsewn sequins).  About thirty minutes before they were set to arrive, I realized we should have a little gift for their son, too.  Like a lot of five year old boys, he is really into Legos right now.  We still have quite a collection of Lego magazines and catalogs from when our kids were younger, and I thought we could whip something up out of those.  The kids and I flipped through the pages looking for pictures featuring the same minifigure.  
We then cut them out and attached the pictures with doublestick tape to some playing cards from an incomplete deck.  In keeping with the mini-theme we cut the cards small, too, calling it a Mini Memory set.  Of course, this would work with pictures from any magazine or catalog (Playmobil and American Girl come to mind) and the cards could be kept full size.  It was definitely a quick craft for a quick fix!

Monday, January 21, 2013

Just Sew: Boy's Week


This is my son's second year participating in our local Ski Bus program.  It's a great deal providing transportation, chaperones, and buddies over a two month period where he gets to snowboard every weekend.  Last winter we bought his equipment and outerwear for Christmas and scrounged whatever we had on hand to layer underneath.  Luckily everything still works for this season, but he did have a few requests.
After seeing this hat and beard in a catalog, he asked if I could make something like this for him with a hat he already owns.  I simply measured his face and drew the beard design freehand to create a pattern.  I then cut two layers out of a thrifted brown sweater and sewed them together.  Finally, I sewed buttons into the inside of his hat to attach his new beard.  He likes that it is custom made for him and that he can easily remove the beard from his hat.
His second request was for a new pair of leggings to wear under his 
snowboarding pants.  (He may or may not have been subjected to wearing his sister's leggings last year).  I found a pair of men's sporty pants that are lined with a light fleece on the inside, but have a thicker, kind of polyester (more water resistant?) fabric on the outside.  Using his sister's leggings I traced out the pattern for his pair.  I unintentionally lined up the existing seams so they go straight down the middle of his legs from the front.  My husband likes the rockstar quality they give the pants.
While he actually already has a good thermal shirt to wear under his sweatshirt and snowboarding jacket, I did offer to make him another one since I was try to create an entire look for Project Run and Play, anyway.  Unsurprisingly, we don't give a lot of thought to name brand clothing around our house.  However, skateboarding brands are a little different, as you are often showing your allegiance to a certain skater by wearing their company or team's logo.  So far, my son takes into account a skateboarder's personality just as much as his ability.  The logo on the left is for the company Fallen, which was started by Jamie Thomas, who has proven to be a pretty good role model (married, three kids, clean living).  After sizing down a men's thermal, I used the scraps to create the Fallen logo.  Originally, I was going to use a contrasting color, but I am a lot happier with the grey on grey here.
Like most people sewing for kids, I find making something for the boy to be a lot more challenging than for his two sisters.  He will be twelve this summer and I am keenly aware of how uncool something can be if your mom made it.  Amazingly, when I asked him if he felt weird wearing something homemade, he said, no, he liked that it was made just for him.  Pretty cool kid.  Maybe he'll be someone's role model someday.

Thursday, January 17, 2013

Just Sew: Dots and Stripes

Between Munchkin costumes for a spring production of Wizard of Oz and outfits for my Alice in Wonderland collection last fall, I sewed almost 20 outfits featuring polka dots and stripes in 2012.  And while I really do love polka dots and stripes (I even wore them together in my senior picture) I feel a little tapped out in that category when it comes to sewing right now.  This was definitely the vaguest of my sketches when I planned out my looks for Project Run and Play.  Luckily, my youngest came through with some requests and I suddenly felt inspired.
I went back to my old friend, jersey knit, to create this comfy outfit.  All of the pieces are made from thrifted t-shirts and scraps.  Being the youngest of three, my daughter has spent her life catching up to big brother and big sister, only to emerge as the most competitive member of our family.  She is always up for a quick card game or a race to the next destination or a game of rock-paper-scissors when we are waiting for the ferry.  At some point she saw a cute shirt with a rock-paper-scissors design and asked if I could make one for her.  I really enjoyed embroidering a scrap of white t-shirt into the cutest piece of paper.  I kind of wanted to keep it for myself because it turned out so fun.  One of my students said, "It's so cute!  I just can't stop looking at it" and, I have to admit, I feel the same way.  Anyway, each piece was embroidered and appliqued onto a t-shirt.  I paired the shirt with a polka-dot ruffled scarf, made from a super soft thrifted t-shirt.
Lastly, I made these wrist warmers from one striped and one polka dotted shirt.  (You can barely see the polka dots in the shot, but the whole palms down side is that material).  They looked a little plain, and I already had my embroidery thread out, so I started stitching some colorful dots and stripes into the fabric.  I kept it really minimalistic and I am digging the Eighties vibe from the color combinations and design.  I just might have to borrow them...

A lot of what I have sewn in the past has actually been for costumes or custom orders or for presents and rarely for my own kids.  One goal I have this year is to sew a lot more for my own family (this does include window treatments for our living room).  My daughter was so thrilled I made a shirt just for her that she got to wear to school right after the photos were done.  Even though I wasn't that excited about this challenge, I really like how these pieces turned out and foresee all of them getting lots of wear by all the girls in our family.

Monday, January 14, 2013

Just Eat: Local Eggs

Even though I grew up in a city, I have always been drawn to the country lifestyle.  Since I graduated from high school, I have lived the majority of my adult life in towns with less than 12,000 people.  In 2011 we finally bought a house on our little island, and although it is in a neighborhood, our community shares three and a half acres with a neighboring co-housing community that can be used for gardening and keeping animals.  This allows us to keep chickens, but share in the responsibility with four other families.  Although I anticipated enjoying sharing the experience with my children, I underestimated the personal satisfaction I would feel in raising and caring for these creatures.  There is a certain bliss after I have cleaned out the hen house, maybe moved the fence to a fresh grassy spot, and tossed around some extra scraps for everyone to enjoy.  I totally did not expect to feel like that about some birds.  

Also, and Martha Stewart has been saying this for years, fresh eggs taste really great.  You can seriously see the difference as soon as you crack them.  The yolk is twenty times more yellow than commercially raised eggs, as is the intensity of the flavor.  It has given me great pleasure to pass on some extra eggs each week to one of our elderly neighbors who always raised chickens herself, but now is not physically able to.  She had just stopped eating eggs altogether because store bought eggs tasted so bland and rubbery to her after decades of eating fresh.
I know not everyone is in a spot to keep their own chickens, but you might be able to find someone nearby who can. The website Local Harvest is a good place to start.  Most cities in our area actually allow people to keep three or four birds in their backyards.  I used to buy eggs from a local/cage-free/organic egg business.  And while I know the situation of those birds is better than being literally chained to a perch with their beaks removed while they are fed intravenously (the situation for the majority of factory farmed chickens), the above picture is still a little disconcerting to me.  It is actually from an article praising the aforementioned local egg business for their practices.  But after spending the last year around chickens, I know this situation is not ideal.  My goal this year is to move more towards consuming animal products either from animals that I have raised or that I actually know and trust the person who raised them.  It is a lofty goal, and I know we won't always be able to do it, but any purchases we do make this way will feel pretty good.

Thursday, January 10, 2013

Just Read: The Happiness Project

Back in 2009, when this book came out, I was still the owner of an independent bookstore.  Most of my customers were fairly discriminating readers, and I, myself, could be a little snobby about books.  So, when Gretchen Rubin wrote The Happiness Project, I dismissed it as another self-help book full of fluff.  However, a customer with good taste in reading came in one day raving about this book.  Trusting her instincts, I ordered some copies for the store and read one for myself.  Now, just about every book club on the island has read and discussed this book, and everyone I've talked to has gleaned something from it.

What makes this book stand apart from others like it is Rubin's background.  She has a law degree (from Yale, no less) and has researched and written biographies on political figures like Winston Churchill and John F. Kennedy.  Where other books in this category might be light and feel like just a lot of common sense, Rubin has done her homework and provides loads of scientific research for her project.  She also tackles her goals systematically, dividing them up into categories and setting deadlines.  This type of organization and approach appeals to me, as I love to make a list and cross things off.

So, what does this book have to do with this blog?  The focus of the first chapter/month is Boosting Energy.  Rubin concludes from her research that physical clutter was weighing her down and dealing with it daily was sapping her energy.  I like the way she addresses different categories of clutter:  Sentimental, Bargain, Freebie, etc.  She acknowledges the way we tend to value stuff and justify its existence in our lives.  Also, after dealing with her clutter, she is much more conscientious about what she is going to bring into her home.  This is the part that rang true for me.  After making a decision to consume more conscientiously, our family evaluates everything coming into our home (clothing, appliances, gadgets, etc.) whether we will be purchasing it new, second-hand, or getting it for free!  Even our kids will stop and question if they really need something before deciding to purchase it or accept a hand-me-down from a friend.

Rubin also discusses the value she began to place on experiencing things rather than consuming things throughout her experiment.  This is a value we have also tried to instill in our family, often giving experiences (trips to museums, dance performances, skateboard competitions) as gifts, rather than things.  When our kids were younger, we often requested Family Memberships to the local zoo and children's museum as Christmas presents, rather than making lists of items the kids could receive from grandparents.

As it is the New Year (sort of still, right?), this is a great read to get you motivated to make some changes that have probably been nagging you for awhile anyway.  And though you may feel you are getting a late start (the chapters are divided by months), you'll find some chapters are inappropriate or unnecessary to your life anyway.  For example, Rubin devotes a month to her career and many of us are not in a spot where we are thinking about that.  She also spends another month exploring her spirituality, another topic many people already feel they have a pretty solid footing in.  So, in the end, anyone could pick and choose their own areas and set their goals accordingly.  Good Luck!


Sunday, January 6, 2013

Just Sew: Party Dress Remix

It is already time for another season of Project Run and Play.  Last fall, I successfully completed all of the challenges, although not to the level I had originally sketched out.  This season, my goal is to follow through on all of the elements I have planned.  The first challenge is a Pattern Remix of The Party Dress from Cottage Home.  There were two elements in the design that stood out to me and influenced my final product:  the looped button closures and the extra wide sash.  I immediately pictured the button loops on the front instead of the back, and the sash reminded me of an obi belt on a kimono.  The sketch I drew felt very Asian to me, and my youngest remarked it would be a perfect look for her upcoming Japanese unit in school.  I decided to only make a top, since she is really not into dresses right now and I want her to wear it more than just the one time for her class performance.

After searching various thrift stores for a fabric that read "Japanese" in some way, we kept coming up empty handed.  And so, I bought my first bit of new fabric for the first time in several years.  I still have mixed feelings about this purchase.  On the positive side: we bought it from our local, independently owned fabric store and it was used to make a well-constructed garment that will last through several children.  On the negative side (for me):  the fabric was not produced sustainably in any way and I feel badly about supporting an industry that does so much harm to the environment and exploited people groups.  It is probably a decision I will always feel conflicted about.  In the future, I will continue to look to recycling fabrics first, and will probably be more willing to compromise my vision and settle for a less desirable fabric.  Maybe.
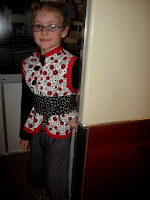
Despite my feelings about the purchase, I really do love the prints my daughter chose.  We spent a lot of time with some cute Kokka fabrics, but most of the available bolts had too much pink.  Besides avoiding dresses, she is also into avoiding pink.  Just as we were about to reluctantly pull some fabric to be cut, she discovered a section we had somehow missed that was full of very traditional Asian prints.  I love that she picked a design with a white background, as it keeps everything lighter and younger looking.  I also knew I already had two vintage Bakelite buttons that had a similar shape to the red flowers in the fabric.
For the remix, I simply turned the bodice around to feature the closures in the front.  I also did a very simple "peplum-esque" bottom to turn the dress into a top.  For the sash/obi belt, I followed the concept of this tutorial, sizing it down to fit my daughter, of course.  The pants are basic drawstring pants made with leftover fabric from last season's white sheet challenge (the top is also lined with that fabric, as well).  She requested grey pants to match the small grey flowers, and they amazingly came out after the first batch of dye.  I used some of the scraps to create an origami butterfly for her hair, which, really, was a nice idea in theory, but did not translate well in real life, hence no close-up shots of that!  We are in the midst of a drizzly winter in the Pacific Northwest, so we took our photos inside of a Japanese subway car at the Seattle Children's Museum.  She was really happy with the look and looked pretty adorable in the Japanese section of the museum.