Learn. Choose. Change.

I pledge to learn the true cost, to people and the planet, of what I eat, wear, drive, use and do every day. I choose to consume justly and to increasingly change my habits.
Showing posts with label upcycling. Show all posts

Friday, November 1, 2013

Just Make: Homemade Halloween


In order to compensate for the challenges of trick-or-treating in a rural community, our merchants shut down the roads in town to allow walking traffic only and pass out candy.  We had an unusually moderate night temperature-wise last night, which allowed for lots of chatting and admiring costumes.  And although the whole event is a mixed bag for me (I can get pretty worked up about fair trade chocolate and high fructose corn syrup), I do love to see the inventiveness that shines through in people's costumes.  Homemade costumes are definitely the norm around here, ranging from simple (cardboard box Legos, Minecraft, etc.) to elaborate (an oyster shell where her head sticking out was the pearl).

My youngest settled on being a Hedgehog pretty early on.  I was able to keep an eye out for brown clothing at our local thrift store.  The one elusive item was the shaggy fabric for her "spikes".  Last weekend I picked up a white bathmat just in case our trip to the city didn't pay off either.  Surprisingly, we struck out at a huge fabric store, too.  I ended up dyeing the mat brown and sewing it to a resized men's sweatshirt.  We scored an off-white velvet top for her belly and paws and finished off the look with some women's leggings that I also resized.  She was very happy with the whole thing and said it looked just like she pictured.

Considering CNN reported that Americans throw away 40 million pounds in Halloween garbage each year, and that much of that is plastic costumes, making your own out of repurposed clothing is a good way to put a dent in those numbers.  A lot of people also first experiment with sewing and upcycling making costumes.  Hopefully, they'll gain confidence and realize the same techniques work with everyday clothes, too!

Saturday, September 21, 2013

Just Make: Melissa & Doug Shadow Box

Sometimes it is hard for me to believe certain toys in our house are over ten years old.  Part of that is due to how unbelievably quickly the time has flown since we had kids, but I am also amazed at the longevity some of these toys have had in our lives.  The toy kitchen (affectionately known as Tiny Kitchen) along with our wooden play food sets are among our oldest items that still get used regularly.  My youngest still has the Tiny Kitchen tucked away in the corner of her very tiny room and loves to play restaurant with her friends.  However, long gone are the days when we carefully put each set away in its appropriate tray.  As we were streamlining our toy collections this summer, I set these Melissa and Doug trays aside, sure I could use them in some way.
Sitting empty, they reminded me of the old printer's trays people often repurpose as shadow box displays.  I simply wiped them down, sanded any chips in the wood, and then painted them.  We already had black all-purpose spray paint on hand, so I used that.  Obviously, your options are endless when it comes to painting.  I also lined some of the sections with dictionary pages and wrapping paper.  By just using double stick tape, I figure I can change it out if I want.
This was such an easy project that has a lot of versatility.  I'm still deciding if I want to mount them on the wall or leave them lying flat to corral our more varied collections, like my youngest's French collection above, or some of our more special ornaments over the holidays.  Either way, I'm happy to keep these in our lives just a little longer.


Friday, September 13, 2013

Just Sew: Operation Project $0

About a year ago I started actively participating in the sewing blog world (after stalking/creeping for a year before that).  One of the first blogs I chose to follow was Suzanne's Winter Wonderings Wanderings & Whatnot.  She was challenging herself to create a fall wardrobe for her twin sons without spending any money by using up fabric in her stash and upcycling other cast off clothing.  At the time, I hadn't run across any other blogs with that kind of focus and was excited to find a kindred spirit.

What began as a personal challenge for Suzanne a year ago, has blossomed into a full blown blogging series featuring some heavy hitters in the sewing blog world, that she is calling Operation: Project $0.  While none of my kids were in dire need for an entire fall wardrobe, we did fill in some gaps at the thrift stores before school started.  As we were shopping, it became evident that my youngest has really developed an eye for the potential in clothing.  She knew just what she wanted to (re)create for her first day of school outfit.

Each of the pandas on the shirt above were cut out and reapplied to a thrifted t-shirt (half off at $1.50).  The pandas came from a hand me down shirt that has been in the pajama drawer due to its overall "rattiness".  
The jeans were also a hand me down from big brother, that were, of course, blown out at the knees.  We talked about different ideas for patches, and finally settled on embroidering one of her favorite phrases, "Art Rocks" (this is not the first time I have embroidered this phrase).  We wrote it out in many styles and decided to go with a Rock and Roll kind of font.

She was so proud of her customized look and could not wait to wear it on the first day of school.  I am so grateful for her creative spirit and look forward to collaborating with her more throughout the year.

Thursday, February 14, 2013

Just Sew: Signature Look

Well, it is the last week of Project Run and Play and I successfully completed all of the challenges.  Kind of.  The final challenge is always to complete a signature look.  Many of the people sewing along really look forward to this week, but I always find it pretty intimidating.  I feel like I have a long life of sewing ahead of me, and have just barely begun the journey - most likely, I am in the getting a full tank of gas before you really hit the road stage.  I am nowhere near nailing down a "signature" look.

Instead I looked at the elements that characterized this season of Project Run and Play for me.  First and foremost this time, everything  I sewed was in response to requests from my kids.  Previously, I have made whatever I wanted and then just sold the items my kids didn't claim for themselves.  Secondly, I worked with a variety of materials beyond old t-shirts and jersey knits.  Lastly, I have really been into the color grey, and I think at least a little bit showed up in every challenge.

I hadn't made anything for my oldest this season and asked her to pick out a dress she liked so I could try and make it.  She gave me several choices, and after looking at the construction and for tutorials online, we settled on this one from Modcloth.

It is a nice, light grey with a paisley pattern worked into it.  We actually had a white sheet with a similar pattern woven into it that we just didn't use any more (downsized mattresses) that I dyed grey.  As you can see, our grey came out much darker, which was disappointing.  I actually only pinned the crocheted lace to our dress because I want to try bleaching/removing some of the color.  Hence, the "kind of" statement in the first paragraph.  


Other than the color I am mostly satisfied with the dress.  The entire bodice is lined and I made an effort to finish it nicely on the inside.  I also successfully dyed the lace with tea to make it closer to ivory, which is what my daughter wanted (although she is wavering on the lace and might want it plain after all - good thing it's just pinned!).  In the end, we decided to forego the buttons, too.

I did not even attempt to make some sort of tutorial for this, as I was really just making it up as I went along.  Everything was self-drafted, trial and error, with A LOT of fittings.  This really pushed my skills and there were probably just as many mistakes as successes.  Once again, I am glad I gave this season of Project Run and Play a try and have definitely seen my skills improve in a very short time.

Sunday, February 3, 2013

Just Sew: Men's Shirt Re-fashion

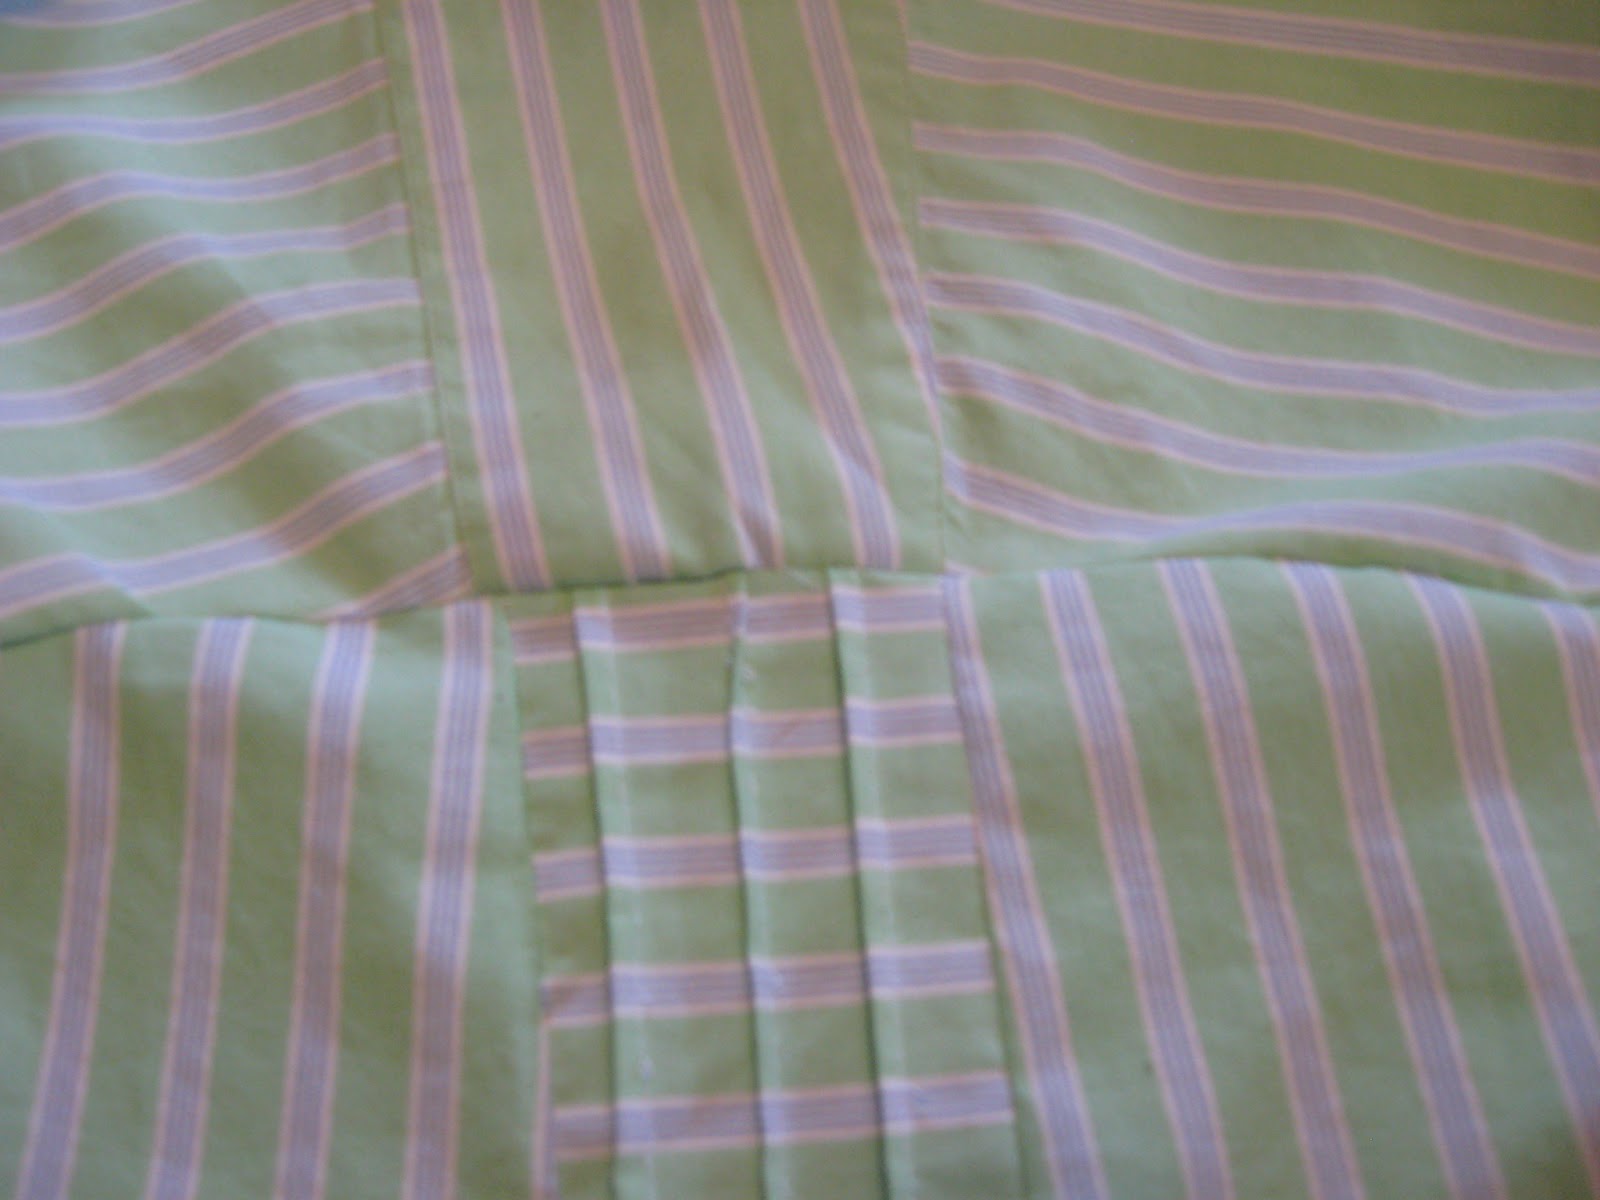
Anyone who has been shopping at a thrift store knows there are always A LOT of men's dress shirts on the racks.  And for every shirt there seems to be a tutorial on how to re-fashion it.  The challenge for this week at Project Run and Play is to create a look using a men's shirt.  My goal this week was to make something I hadn't seen before.  I actually began playing around with this design a few weekends ago because I didn't have a clear idea for this look.  The inspiration came from two designers on last season's Project Runway, Dmitry and Melissa.  Keeping in mind Melissa's cool collars and Dmitry's clean lines and tailored tucks, I tried to incorporate those elements while cutting and pinning this shirt.
 

One of my favorite details is that I swapped out the buttons for these vintage Czech glass buttons with little cats on them.  I picked up the idea of blue and cats again in an embroidered detail on the tailored shorts I made to compliment the shirt.  Two summers ago I scored several bundles of vintage suiting material at a yard sale. 
 
This grey is a nice lightweight wool, and when lined, works well for pants or shorts. Besides the cat, I also added some piping detail on the front, from leftover shirt fabric.  Also, this was my first time creating an adjustable elastic band on the inside of the shorts.

I think because I started this so early I felt like I had a lot of freedom to take risks that I might not have if there was a crunch for time.  Originally the front was just one piece, but then I thought it would be fun to play with the stripes and add some tucks.  I also tried three different styles of sleeves before I gave in to a sleeveless look.  When designers on Project Runway opt for sleeveless, I often think it is a cop-out, and I didn't want to do the same thing.  I did forgo an exposed zipper, and put in a nice side zip instead, though. 
In the end, I am really glad I had so much time and am really pleased with this look.  My youngest likes it, too, and wanted me to try some outlandish "runway" hairstyles and poses when I took the pictures.

Re-fashioning the shirt was actually pretty simple.  First I deconstructed the shirt by cutting off the sleeves and cutting the shirt up both of the seams.  Then I turned the shirt sideways so the front button placket was over the left shoulder.  Next I used a narrow t-shirt as a pattern for the bodice.


Using the existing hemline I drafted the bottom of the shirt.  Originally, I thought about having a more flared out style, but after trying it on my daughter, I decided to keep it more tailored.  After pinning and sewing those pieces together, I realized a side zip would be necessary.  Although functional with a standard zipper (that's all I had on hand), a separating zipper makes the shirt a lot easier when dressing.  The last step is creating half inch bias tape to finish the edges around the armholes.  I used some fabric from the shirt, but you could use a contrasting fabric, too.  I really like how unique this design is, and can't wait to make a summery white one for myself.

This piece was featured by Pam over at Threading My Way.  She has created an amazing resource of tutorials through ongoing linky parties.

Sunday, January 27, 2013

Just Sew: Hooded Scarf

The theme for this week's challenge at Project Run and Play is Valentine's Day.  It is not a day I usually put a lot of effort into, except to help our kids make cards for their classmates each year.  At first I was worried I would only be able to come up with cutesy ideas for my look, and while the above picture is certainly cute, the humor helps it veer away from cutesy.
The hooded scarf is actually a great project for a beginning sewer.  I have taught sewing classes for kids, and this is always a successful activity.  These scarves both began as long sleeved shirts.  I was able to use some shiny scrap fabric and foam to make the horn and antennae.
Cut straight across the shirt at the armpits.  The lower portion will become the hood, and the neck and sleeves will function as the scarf.
Fold the lower portion of the shirt in half, taking care to line up the bottom hem and smoothing out wrinkles.  A lot of mass produced shirts are put together a little wonky, so this takes special attention sometimes.  This gives the hood a double thickness, which makes it lay nicely on your head, and is really cozy.  The bottom hem will be the edge of the hood, framing your face.  (If you make this with kids, you could always cut the shirt at the side seams and forego the two ply version so it is easier to sew through).

After you pin and sew your hood (right sides together) and then flip it right side out,  pin the hood to the inside of the neckline of the shirt.  I like to center it above the label first and work my way out to the edges.  The bottom edge of the top portion can be flipped inside out and pinned right sides together and sewn at this point, too.  Now attach the hood to the neck, and you are done!  This is an extremely versatile pattern that can be customized into just about anything.  I also added a bias trim made from other t-shirts to make these a little more special.
I am just so happy with how these turned out.  The little boy in the picture with my daughter is a close family friend and I have been wanting to sew something for both of them for a while.  I had actually planned on a Tweedle Dee and Tweedle Dum look for my Alice collection last fall (it was going to be my PR&P Boy's Week last season, too), but was too overwhelmed with my new job to get it done.  They are the same age and often get asked if they are twins.  They even both got glasses in first grade.  Despite a makeshift shoot in the garage (raining in the Pacific Northwest again, go figure), dead camera batteries, and switching to an iPhone midway, they were pretty cooperative...until I asked them to hold hands.  I am not ashamed to admit I stooped to bribing, and will be taking them out for ice cream after school this week.


Monday, January 21, 2013

Just Sew: Boy's Week


This is my son's second year participating in our local Ski Bus program.  It's a great deal providing transportation, chaperones, and buddies over a two month period where he gets to snowboard every weekend.  Last winter we bought his equipment and outerwear for Christmas and scrounged whatever we had on hand to layer underneath.  Luckily everything still works for this season, but he did have a few requests.
After seeing this hat and beard in a catalog, he asked if I could make something like this for him with a hat he already owns.  I simply measured his face and drew the beard design freehand to create a pattern.  I then cut two layers out of a thrifted brown sweater and sewed them together.  Finally, I sewed buttons into the inside of his hat to attach his new beard.  He likes that it is custom made for him and that he can easily remove the beard from his hat.
His second request was for a new pair of leggings to wear under his 
snowboarding pants.  (He may or may not have been subjected to wearing his sister's leggings last year).  I found a pair of men's sporty pants that are lined with a light fleece on the inside, but have a thicker, kind of polyester (more water resistant?) fabric on the outside.  Using his sister's leggings I traced out the pattern for his pair.  I unintentionally lined up the existing seams so they go straight down the middle of his legs from the front.  My husband likes the rockstar quality they give the pants.
While he actually already has a good thermal shirt to wear under his sweatshirt and snowboarding jacket, I did offer to make him another one since I was try to create an entire look for Project Run and Play, anyway.  Unsurprisingly, we don't give a lot of thought to name brand clothing around our house.  However, skateboarding brands are a little different, as you are often showing your allegiance to a certain skater by wearing their company or team's logo.  So far, my son takes into account a skateboarder's personality just as much as his ability.  The logo on the left is for the company Fallen, which was started by Jamie Thomas, who has proven to be a pretty good role model (married, three kids, clean living).  After sizing down a men's thermal, I used the scraps to create the Fallen logo.  Originally, I was going to use a contrasting color, but I am a lot happier with the grey on grey here.
Like most people sewing for kids, I find making something for the boy to be a lot more challenging than for his two sisters.  He will be twelve this summer and I am keenly aware of how uncool something can be if your mom made it.  Amazingly, when I asked him if he felt weird wearing something homemade, he said, no, he liked that it was made just for him.  Pretty cool kid.  Maybe he'll be someone's role model someday.

Sunday, January 6, 2013

Just Sew: Party Dress Remix

It is already time for another season of Project Run and Play.  Last fall, I successfully completed all of the challenges, although not to the level I had originally sketched out.  This season, my goal is to follow through on all of the elements I have planned.  The first challenge is a Pattern Remix of The Party Dress from Cottage Home.  There were two elements in the design that stood out to me and influenced my final product:  the looped button closures and the extra wide sash.  I immediately pictured the button loops on the front instead of the back, and the sash reminded me of an obi belt on a kimono.  The sketch I drew felt very Asian to me, and my youngest remarked it would be a perfect look for her upcoming Japanese unit in school.  I decided to only make a top, since she is really not into dresses right now and I want her to wear it more than just the one time for her class performance.

After searching various thrift stores for a fabric that read "Japanese" in some way, we kept coming up empty handed.  And so, I bought my first bit of new fabric for the first time in several years.  I still have mixed feelings about this purchase.  On the positive side: we bought it from our local, independently owned fabric store and it was used to make a well-constructed garment that will last through several children.  On the negative side (for me):  the fabric was not produced sustainably in any way and I feel badly about supporting an industry that does so much harm to the environment and exploited people groups.  It is probably a decision I will always feel conflicted about.  In the future, I will continue to look to recycling fabrics first, and will probably be more willing to compromise my vision and settle for a less desirable fabric.  Maybe.
Despite my feelings about the purchase, I really do love the prints my daughter chose.  We spent a lot of time with some cute Kokka fabrics, but most of the available bolts had too much pink.  Besides avoiding dresses, she is also into avoiding pink.  Just as we were about to reluctantly pull some fabric to be cut, she discovered a section we had somehow missed that was full of very traditional Asian prints.  I love that she picked a design with a white background, as it keeps everything lighter and younger looking.  I also knew I already had two vintage Bakelite buttons that had a similar shape to the red flowers in the fabric.
For the remix, I simply turned the bodice around to feature the closures in the front.  I also did a very simple "peplum-esque" bottom to turn the dress into a top.  For the sash/obi belt, I followed the concept of this tutorial, sizing it down to fit my daughter, of course.  The pants are basic drawstring pants made with leftover fabric from last season's white sheet challenge (the top is also lined with that fabric, as well).  She requested grey pants to match the small grey flowers, and they amazingly came out after the first batch of dye.  I used some of the scraps to create an origami butterfly for her hair, which, really, was a nice idea in theory, but did not translate well in real life, hence no close-up shots of that!  We are in the midst of a drizzly winter in the Pacific Northwest, so we took our photos inside of a Japanese subway car at the Seattle Children's Museum.  She was really happy with the look and looked pretty adorable in the Japanese section of the museum. 

Tuesday, January 1, 2013

Just Sew: Ruffled Scarf

Last year while sewing Munchkin costumes for a production of Wizard of Oz, I discovered the versatility of elastic thread.  Ever since then I have been wanting to make ruffled scarves out of strips of t-shirts.  Of course, since it was a project for myself, it always got pushed to the back burner.  Our family was fortunate enough to have a very quiet holiday season that allowed quite a bit of down time for sewing, and I finally got around to this idea.  I made two scarves in less than thirty minutes, and I think this will become my "go to present" for 2013.
Obviously, you begin with a t-shirt in a color or pattern that you like.  I have been trying to incorporate more grey into my wardrobe, phasing out black as my default neutral, and am always a fan of polkadots.  
Cut the shirt into strips.  For my first scarf, I used strips that were around two inches wide from a relatively small t-shirt.  The scarf ended up being a little on the short side and didn't ruffle the way I envisioned (luckily my oldest daughter liked it, so it wasn't a total waste).  This shirt was also on the small side, and I knew I'd be compensating for some lost fabric due to the ruched seams towards the bottom, so I cut pretty skinny one inch strips.  
After attaching the strips together to make one long strip, I sewed with the elastic thread right down the middle.  Two things to remember when using elastic thread:   
1)  You only need to thread your bobbin with it, using regular thread through the top of your machine.  I actually didn't know that at first and spent quite a bit of time trying to thread my machine and needle with elastic thread.  It was one of those extremely frustrating sewing moments.  
2)  The thread will come off the bobbin more smoothly if you have wound it on by hand.  

As you can see, this process twists the fabric some, which was unexpected for me, but I really like it.  I look forward to experimenting with this technique more.


Tuesday, November 13, 2012

Just Sew: Honeymoon Hat

Woo-hoo!  I made the big time and am posting a tutorial over at Project Run and Play today.  All month they are featuring bloggers from their sew along group in Flickr.  I've been working on these fun hats to sell at the textile collective over the holidays.  They are based on a felted wool hat I picked up on my honeymoon seventeen years ago this month.  Be sure to check out my tutorial plus all the others this month.

This tutorial features a hat made from t-shirts, but the same pattern works for old sweaters, sweatshirts, and fleece.  I have also experimented with some groovy suit fabric, but it doesn't have any stretch and I haven't developed a consistent pattern for it yet.  So, after you have settled on some fabric with some stretch, you are going to cut out panels for the main part of the hat.


For a hat sized 0-2T cut one 5x6" and four 3x6" rectangles (five panels total) and one 6" circle.

For a hat sized 3T-7 cut one 5x7" and four 4x7" rectangles (five panels total) and one 7 1/2" circle.

For a hat sized 8&up cut one 5x8" and five 4x8" rectangles (six panels total) and one 9" circle.
Pin and sew panels together (if your fabric has a right side, do it right sides together) creating the body of the hat.  When pinning, take care to line up the tops of the panels that will eventually be sewn to the circle to form the crown of the hat.  It does not matter if the bottoms of your rectangles are uneven, as they will just get folded up into the brim.  Many people feel you can only work with knit fabric if you have a serger, but a zig zag on top of a straight stitch is really just as effective.
 You can now pin the circle to the hat.  Turn the body of the hat inside out and begin pinning the edge of the circle to the tops of your rectangle.  I sew around first with a straight stitch, and then go back over it with a zig zag to give it a little more structure.

 Flip the hat right side out and finish with another zig zag around the exposed crown of the hat.  This step is optional if you like the shape of the hat without it.  Again, I like the structure it adds to the hat.  These sew up pretty quickly (30 to 45 minutes) and although the original Honeymoon Hat shows no signs of wear and tear, it will be nice to have some different color choices.

Monday, November 12, 2012

Just Sew: Potholder Covers

I have been using the same ratty potholders for years, embarrassed of them when we have company or when I use them to take a dish someplace else.  At one point, I tried using a piece of a heavy wool sweater that had been felted as a potholder, but the heat still seeped through and they did not provide enough protection.

You can probably guess where this was going, but it took me a lot longer to figure it out.  I simply sewed slipcovers for my ugly old potholders out of a felted wool sweater.  It was so easy!  I cut two squares a little larger than my potholders, placed the potholder in the middle, and sewed them together.  I like the exposed edge, but one could turn them inside out after sewing and finish them that way.
They are so cute now!  I chose a colorful striped sweater so I have a lot of coordinating color choices for the other two potholders that are left.  I can't believe it took me as long as it did to figure it out,  but now I am so glad it's done.  I can't wait to show them off at Thanksgiving.

Saturday, October 20, 2012

Just Sew: Alice in Wonderland Collection

Earlier this summer I agreed to be the featured artist for our local textile collective's First Friday show in October.  Since then I unexpectedly took a full time job at my kids' school which included hours and hours of commuting and training off-island.  Nevertheless(!!!) I was able to deliver my collection in time for the show.  Each look was inspired by a character from Alice in Wonderland.  Each look also did double duty as a sew-a-long entry for Project Run and Play.  Thankfully, I worked two weeks ahead of PR&P's schedule to finish in time for First Friday.  If I hadn't, I would have once again been unable to submit entries for the last two weeks as my life went into super-crazy mode (now I'm just in kinda' crazy mode).
 The photo shoot was hastily done on the one evening my models and I were all available the week of the show between school and sunset.  Even then, our little Cheshire Cat would only crawl (like a kitty, of course!) and had to be photographed separately, anyway.


My son can't wait to wear the t-shirt and blazer to school.  Meanwhile, his younger sister claimed the mini top hat. 

My favorite shot from that evening.  The sunflowers are so tall it reminded me of Alice being in the garden with the talking flowers.
The collection on display inside the textile collective.  The available space was smaller than I thought and I only put out a tiny portion of my personal Alice collection of books and other items. 
Although I did not put some finishing details on two of the looks and cut one out entirely (Tweedle Dee and Tweedle Dum)  I am so pleased I was able to complete what I did, both for the First Friday show and for Project Run and Play.  I tried some new techniques and feel I have become a stronger sewer in just two months.  I am grateful for both opportunities and look forward to the next challenge around the bend.


Wednesday, October 3, 2012

Just Sew: Boy's Week

With two girls and one boy, I definitely find myself more inspired and motivated to sew for my daughters.  Boys clothes do seem more technical to me and it is hard to make them look cool and not too cutesy and homemade.  Project Run and Play usually incorporates a boy's look challenge into their seasons and this is it.  This week I went with a pretty simple look, dyeing the sweatshirt blazer I made for the Fashion Icon challenge purple and adding some wide "piping" (made from a black t-shirt) for the trim.  My favorite way to dress up a boy is to put him in a t-shirt with a tie applique (using my easy applique techniques found here).  Although these two items will pull double duty this month as the Mad Hatter look for my Alice in Wonderland collection, my son has already asked if he can wear them to school when the show is over at the textile collective (success!).

Originally, I had ambitiously planned a Tweedle Dee/Tweedle Dum look for Boy's Week which included turning sweatpants into tailored, but comfy pinstriped shorts.  However, that was before I took a full-time job at our local elementary school and had to frantically sew during my "spare time" on the weekends.  I do still want to try it, but will probably wait until shorts weather makes its appearance in the Pacific Northwest again, which, realistically is July 2013.

After being met with such enthusiasm for this outfit by my son (don't let the goofy facial expressions fool you) I would like to try something else.  I look forward to being inspired by the designers and other sew-alongers this week.  What's your favorite sewing project for a boy?

Wednesday, September 26, 2012

Just Sew: White Sheet Challenge

Week Three of Project Run and Play challenges everyone to create an outfit using a white sheet.  My sketch for this came pretty quickly.  I knew I wanted to use polka dots and stripes, and had hoped to employ resist dye techniques (for the first time) to get them.  Unfortunately, it did not seem like the results would come out as crisp as I would like, so I resorted to painting the fabric instead.  By utilizing tips I picked up on HGTV about painting designs on walls (tutorial found here) I got the really clean patterns I was hoping for.

This look's second life will be The White Rabbit when I show my Alice in Wonderland collection next week (!!!!) during the First Friday Gallery Cruise.  I was inspired by the classic John Tenniel illustration above for the color scheme and the collar detail.  I also ended up adding a little seam detail in the front inspired by Handmade Martini's Macaron Dress that seemed to be everywhere this last month.  I am so happy with how this outfit came out and cannot wait to add the finishing touches to transform it next week.